Drawing and Anatomy: Make a Mini Model Exercise
In this exercise Drawing and Human Anatomy tutor Tara Versey encourages us to become familiar with the human body, and how it occupies space before we draw it. The aim in this exercise is to gain an understanding of the basic mass conceptions and proportional relationships of the figure.

To draw the human body, we need to become familiar with how it occupies space. The body is multifaceted and inter-relates with the space according to its particular relationship of balance to support. Our perception of it also changes depending on where we are in relation to it. In this way I feel it is important to gather more of an understanding of the physicality of forms. With greater confidence we can then be more prepared to deal with complex variations, and how we may convey these convincingly on our two dimensional surface.

With all its movements, gestures and positions the human body is capable of expressing such a lot. The head and torso are very prominent volumes in the body. The torso comprises of the distinct structures of the rib cage and pelvis joined together by the spine - a chain of firm flexible joints. Together the interaction of these separate parts effects movement in the body; up/down/forward/backward and side to side.
All form in the body is produced by anatomy, and definitions between these forms vary depending on the person. These subtleties and details are of course very complex, and require a keen eye to recognise and portray these individual qualities. We can however help ourselves and learn a lot by initially simplifying some of the main core forms into geometric shapes. From here we find an awareness of the solidity of the body and how each part relates to another in various positions. The aim in this exercise is to become familiar with these basic mass conceptions and proportional relationships.
Materials

Directions

1. Measure and draw templates. The wire in a rough way represents the spine, and it will be important to allow 1-1.5cm gap between each block. I have scaled down the average ratio of these sections to make a smaller relational version. I simplified mine a little in the demonstration – but for more accuracy, I suggest for the head: 2.5cm wide x 3cm deep x 3.4cm high- for the torso: 4cm wide x 3cm deep x 5cm high – for the pelvis: 4cm wide x 2.5cm deep x 3cm high.
Start by drawing out templates for each cube on the card- (see picture above) -make sure you have tabs on various sides to join them together. Bend at each crease to start forming the 3d form (see picture below).

2. Use a sharp point to make 2 holes at top and bottom of cube
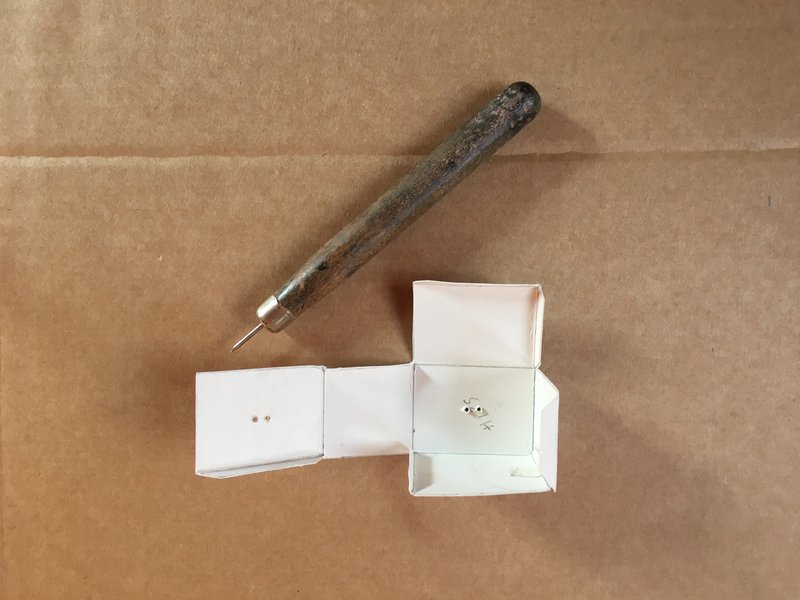
3. Cut a long strip of wire and start to feed it through the card representing the head
Make 2 small holes fairly close together at the top and bottom of each cube (see picture above). For extra strength you can make the holes through masking tape on the card. Cut a good length of wire and gently feed it through the two holes, twist the two strands together to secure and feed them again through the bottom two holes and twist again before feeding through the holes in the top of your torso section (see picture below).

4. Gradually start to secure the cubes using masking tape

Gradually fix your cubes together using making tape on the inside or outside. Repeat this method adding the pelvis last of all. It can be a bit fiddly and requires patience and steadiness.
5. Twist the wire together between each hole leaving a gap between the head and the next card form of the torso


Once complete you will have a satisfying model structure that hopefully starts to hint at a human like form. You may wish to embark further by adding legs and feet and getting it to stand. Observe people and see how they move, stand and sit – and see how this relates to your model.
Draw from your
model from different angles to further your understanding of how to depict
these forms in space.
Drawing and Human Anatomy starts on Thursday 14 May.
For more information and to book click here
Artworks from top: Anna Hawley Jarman, Jake Grewal


